

IronCAD - Linked Cross Sections

Create independent parts all driven by the one linked cross section
-
Step 1: Create the Cross section
Create the cross section to drive the parts. In this case I have created 1 quarter of an I beam.

-
Step 2: Tempting but does not work
It tempting to used the triball to create linked copies of this cross section but this does not work. When the cross section is consumed upon creating the extrude the link is broken

-
Step 3: Create the Extrude
Create the extrude solid, but before finishing from the dialogue, click the second tab " Profile Behavior",

and choose "Link to Existing Profiles"

Click ok to create the extruded part
-
Step 4: Create an additional extrude
Using the same method as the previous step create and additional extruded section to a different length, and move it over to the side using the triball.

-
Step 5: Make I beams
Copy link the intellishapes over within each of the parts to make an I beam.


-
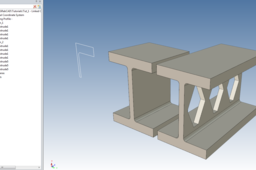
Step 6: Finish
Finished; We have a driving cross section, and two different parts both linked to the one cross section.
To test, try changing the cross section, shown bellow I have altered the thickness of the horizontal part of the beam by 5mm (by moving the line highlighted in yellow vertically upwards)

Both beams are now thicker, and I've also cut some material in one to illustrate that the parts can differ but still feature a linked cross section.

