

Tutorial: How to model a braided hose in Solidworks?

Are you sure you're ready to witness awesomeness?
-
Step 1:
On the top plane draw a circle with a 15mm diameter:

-
Step 2:
You can exit the sketch but you don’t need to. Go to Insert->Curve->Helix/Spiral:

-
Step 3:
Now draw a 24mm counterclockwise constant pitch helix starting at 0º. The number of revolutions will determine the overall length of the hose. I just set it to 20:

-
Step 4:
Now on the right plane draw a horizontal construction line from the origin to the helix starting point:

-
Step 5:
Draw a perpendicular construction line (to the last line you just drew) measuring 4mm:

-
Step 6:
Draw another construction line collinear with this last one:

-
Step 7:
Now you can insert a Smart Dimension on this last line (of 4mm), or you can select both vertical construction lines and add a relation of “Equal” to them:

-
Step 8:
Use the first vertical line to draw a 3 Point Arc whose start and end points coincide with the start and end points of said line:

-
Step 9:
Draw another horizontal construction line starting at the arc middle point and ending at the vertical line middle point:

-
Step 10:
Set the dimension of this last line to something like 0.3mm:

-
Step 11:
Draw another 3 Point Arc using the above vertical line the same way as before, but now invert the side of the concavity:

-
Step 12:
Select both arcs and add a relation of “Tangent”:

-
Step 13:
At this point you need to add a Linear Sketch Pattern of both arcs on the Y-axis with a spacing of 8mm and a number of instances of 3. Since by default the number of instances on the X-axis will be set to two you need to set it to 1 and proceed:

-
Step 14:
Navigate to the “Surfaces” tools tab and select the “Swept Surface”:

-
Step 15:
Choose the last sketch you did (the one with the arcs) for the profile and the helix for the path:

-
Step 16:
Start a new sketch on the top plane and press the “Convert Entities” button:

-
Step 17:
Now select the very first sketch you did (the 15mm circle). It will be invisible so you have to expand the feature tree (just click the little + sign):

-
Step 18:
Insert another Helix with the exact same settings as the first one except now make its direction clockwise:

-
Step 19:
Again on the top plane start a new sketch and draw a simple vertical line:

-
Step 20:
Navigate to the “Surfaces” tab and choose another “Swept Surface”. Now the profile is the simple vertical line and the path is the clockwise helix:

-
Step 21:
Start a 3D Sketch and press the “Intersection Curve” button:

-
Step 22:
Select all the 7 faces that you have in your model up so far and press OK:

-
Step 23:
This step is not mandatory (at least if your hose won’t be curved in 3D space) but I prefer to do it anyway. Select all the entities that make up your 3D Sketch (you can just draw a big selection rectangle around all of them) and go to Tools->Spline Tools->Fit Spline:

-
Step 24:
Select “Delete geometry”, lower that tolerance and deselect the last 3 options.
BTW if there is anyone from Dassault Systèmes reading this let me tell you mate that having the last 3 options checked by default is a major PITA, especially if I am trying to fit a spline over a large number of entities (as in this case) because the program really starts to slow down (having to do so much math). Personally I would prefer to have the 3 options unchecked by default, but anyway let's continue:
-
Step 25:
Now you can exit from your 3D Sketch and hide the two Swept Surfaces (Right mouse button over the name of the surface to hide (on the feature tree)->Hide):

-
Step 26:
Let’s create a new reference Plane perpendicular to the 3D Sketch, to draw a circle to serve as the cross section of our strand:

-
Step 27:
So start a new Sketch in the plane you just created and draw a 0.2mm diameter circle whose center is the origin of the reference plane:

-
Step 28:
Now you can hide that reference plane if you want. Do a “Swept Boss/Base” and choose for the profile this last circle and for the path the 3D Sketch:

-
Step 29:
It may not look like it but you’re done. Let’s just add the remaining strands and see our final model. So start a new sketch in the Front plane and draw a simple vertical line (to serve as a guide for a circular Pattern we will be doing shortly). It doesn’t matter its length or where it starts or ends as long as it is coincident with the origin (in SW being coincident doesn’t actually imply passing through…):

-
Step 30:
Well let’s just do the fore mentioned circular Pattern. Use the this last vertical line as the Pattern Axis, use an angle of something around 3º and a number of instances of 4, choose the strand and press OK:

-
Step 31:
Do the exact same step but reverse the direction of the circular Pattern:

-
Step 32:
Now do a linear Pattern. Select the last vertical line as the Pattern Direction, set the spacing to 2mm and the number of instances to 12. Select the 7 bodies and press OK:

-
Step 33:
Not bad. Not bad at all. It’s starting to look like something. Let’s just wrap it up. Do a mirror along the Right Plane of all the bodies. You don’t have to select everyone individually, you can expand the Bodies folder and select the first body hold Shift and select the last one too. If you have “Merge solids” checked, uncheck it and press OK:

-
Step 34:
Let’s just move the bodies created with the mirror feature to resolve the intersection that exists as of yet. Go to Insert->Features->Move/Copy and move the bodies 1mm in the Y-direction:

-
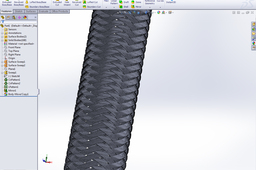
Step 35:
Holy Sweet Jesus of Heaven. It’s a motherf*cking braided hose:

-
Step 36:
We’re done, this is it. It’s a straight braided hose, not curved in 3D space. It could be made to be more realistic the problem is that my computer can’t handle it at the moment.
Btw, you can't plagiarize my work. You can upload a Youtube video or a blog post with a similar tutorial as this one but you have to include a link to this page. And no, I will not believe that you happened to discover a way to model a braided hose all by yourself as soon as I have uploaded a tutorial on how to do it. I'm looking at you Ben and Ed Hawkins.
