

Learn about the GrabCAD Platform
Get to know GrabCAD as an open software platform for Additive Manufacturing
Visit our new homepage


Hi guys...
I need some advises for this problem that i got.
so, we have an engraving machine for writing part code on the thin stainless steel plate (range 2mm~3mm).
There are 2 type of metal plate we got :
In current condition, while engraving the letter, we still use fingers to hold onto the metal plate for it not to moving/shaking.
Engrave machine :


metal plate :


So guys, please help.

those holes, while attached with bolts, were actually used to hold the metal plate.
but, it is still shaking thus the letter won't get paralelly straight.
i mean, there should be a clamp to hold the metal plate.

I come with these i deas, but it might not work i think.
1.) using toggle clamp with groove way underneath

2.) using wedges to make it proportionally equals.

Hello,
I just came out with a simple concept. Have a look, if it serves your purpose.
It's basically a long Metal Sheet with a slot on it. Use locating pin for various parts.
Clamp on Table.
Thanks
Raje


could you just use toe clamps? that's what we'd use to hole little/strange shaped things is the shop where I used to work:


No sweat. A simple clamp assembly can be made that will securely hold either the rectangular or lenticular parts. Simply mill the top hinged holding plate to the profile of the parts (plus a little to make loading quicker), the lenticular piece to a depth of 2.1mm, and the rectangular piece to 2.6mm. Hinge it down to the flat base plate, clamp it down (working on a quick release clamp mechanism) and Bob's your uncle.
I'm assuming the etching stylus makes a straight in and out pass, otherwise the top fixture could be in the way.
See illustration.
Almost done.
Rob
Took another look at the whole concept and rethought it completely.
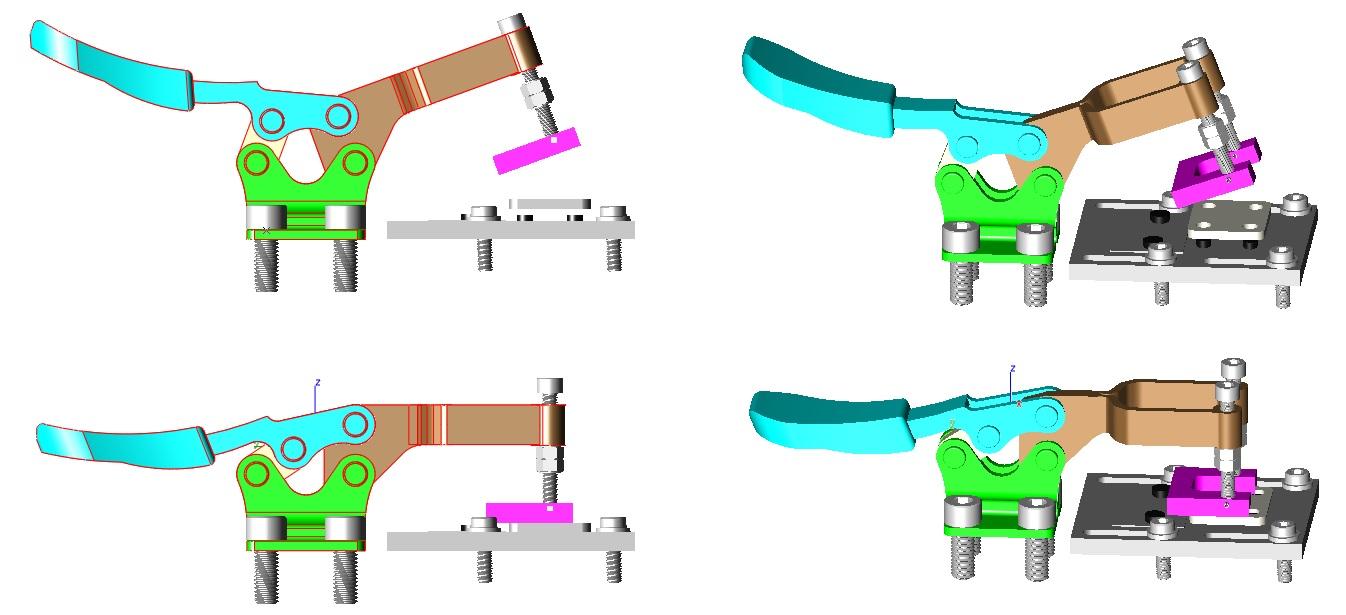
The core of it is a modified hold down clamp available from McMaster-Carr: https://www.mcmaster.com/5128A22/ with the arms splayed out to clear the stylus.
The clamp base is 6061-T6 0.25" (6.35mm) thick milled down 0.5mm for the rectangular plates. Saves having to readjust the clamp. Locating pins, four for the rectangular plate, and two for the lenticular protrude only 2mm. Cycle times in the five to ten second range, faster if an auto feed is implemented.
The base holds either plate, just loosen the bolts, slide it to the appropriate fixture, and tighten down. That is on the assumption that runs are batch based rather than as it comes.
Working up the BOM, and can export in a variety of CAD formats.
About https://www.mcmaster.com/bolts: most hardware, bearings, ah hell, practically everything a fabricator needs is available as CAD downloads, saving hundreds of hours drafting. In fact, the clamp is imported as separate components, enabling quick motion studies.
Rob

If you don't receive the email within an hour (and you've checked your Spam folder), email us as confirmation@grabcad.com.


