Learn about the GrabCAD Platform
Get to know GrabCAD as an open software platform for Additive Manufacturing
Visit our new homepage
Home
Control
Shop
Streamline Pro
Partner Program
Print
Community
Log in
Library
Challenges
Groups
Questions
Tutorials
Engineers
Blog
Log in
Learn from thousands of free Tutorials.
New user?
Join the community
or
log in.
Tutorials
Most liked all time
Recent
Most liked
Most viewed
Most commented
This week
This month
All time
Category
Design & CAD
Modeling
Drafting
Assemblies
BOM
Dimensioning / Tolerancing
Translations
Manufacturing & CAM
3D Printing
Tooling
NC Machining
Composites
Measurement / Inspection
Simulation & CAE
FEM
CFD
Kinematics
Process Simulation
Engineering Fundamentals
Theory
Process
Standards
Other
Software
Snagit
Alibre Design
ArchiCAD
AutoCAD
AutoCAD Electrical
Autodesk 3ds Max
Autodesk Alias
Autodesk Inventor
Autodesk Maya
Autodesk Revit
Autodesk 123D
BricsCAD
Bentley MicroStation
BlenderCAD
BobCAD-CAM
CATIA
Delmia
DraftSight
FreeCAD
Femap
Fusion 360
Geomagic Design
IronCAD
JT
Kompas-3D
KeyCreator
KeyShot
Lagoa
Luxology
Mastercam
Moi3D
NX Unigraphics
OBJ
Onshape
OpenSCAD
Parasolid
Powermill
Powershape
Pro/Engineer Wildfire
PTC Creo Parametric
PTC Creo Elements
Rhino
SpaceClaim
SOLIDWORKS
solidThinking Evolve
Solid Edge
SolidFace
STEP / IGES
SketchUp
STL
TopSolid
TinkerCAD
T-Flex CAD
TurboCAD
VectorWorks
ViaCAD 3D
VRML / WRL
ZW3D
GrabCAD Print
Rendering
GrabCAD Community
GrabCAD Workbench
Text file
3D Manufacturing Format
Cinema 4D
Other
Skill level
All levels
Beginner
Intermediate
Expert
Assemblies
×
TinkerCAD
×
GrabCAD Print
×
Text file
×
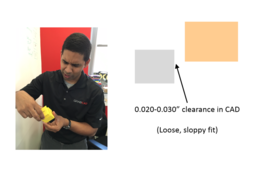
How to FDM Print for Part Sliding Clearance
GrabCAD Tutorials
in
Assemblies
13
4
Intermediate
If you are 3D printing parts that have to fit/slide together after printing, you will need to put some sort of clearance between those parts in your CAD system. A good starting place is a clearance 2x the layer height you are going to print at, but you should make a few smaller test prints at different clearances to see if the 2x layer height rule holds for your particular situation and orientation. Have fun and happy printing!
GrabCAD Print
sliding
clearance
printing
3d
fdm
Stacking Your Parts in Z for FDM
Stratasys
in
Assemblies
2
0
Intermediate
Have long thin flat parts you’ve always wanted to print right on top of each other in FDM but the slicer never allowed you to? Learn how to use this exclusive new feature in GrabCAD Print Pro!
GrabCAD Print
fdm
stacking
stratasys
3d printing software
grabcad print pro
GrabCAD Print Pro™ - Per Part Groups For Service Bureaus
Stratasys
in
Assemblies
1
0
Expert
The premium version of GrabCAD Print™, GrabCAD Print Pro™ is now available! This version includes new & enhanced features. This tutorial will explain per part estimation & assembly grouping!
GrabCAD Print
part estimation
assemblies
grabcad print pro
3d printing software
grabcad print
JP_005_GrabCAD Print: 部品摺動部の隙間をFDM造形する方法
Stratasys Japan
in
Assemblies
0
0
Intermediate
造形後にはめ合わせるまたは摺動(スライド)させる必要がある部品を3D造形する場合、CADシステムで該当する部品の間にある程度の隙間を設ける必要があります。目安として、造形する際の積層ピッチの2倍の隙間から始めるとよいでしょう。ただし、小さいサイズで何度かテスト造形を行い、積層ピッチの2倍の法則が特定の状況や向きに当てはまるかを確認することをお勧めします。それでは3Dプリンタで楽しくモノづくりをしていきましょう!
GrabCAD Print
fdm
3d
printing
clearance
sliding