Learn about the GrabCAD Platform
Get to know GrabCAD as an open software platform for Additive Manufacturing
Visit our new homepage
Home
Control
Shop
Streamline Pro
Partner Program
Print
Community
Log in
Library
Challenges
Groups
Questions
Tutorials
Engineers
Blog
Log in
Learn from thousands of free Tutorials.
New user?
Join the community
or
log in.
Tutorials
Most liked all time
Recent
Most liked
Most viewed
Most commented
This week
This month
All time
Category
Design & CAD
Modeling
Drafting
Assemblies
BOM
Dimensioning / Tolerancing
Translations
Manufacturing & CAM
3D Printing
Tooling
NC Machining
Composites
Measurement / Inspection
Simulation & CAE
FEM
CFD
Kinematics
Process Simulation
Engineering Fundamentals
Theory
Process
Standards
Other
Software
Snagit
Alibre Design
ArchiCAD
AutoCAD
AutoCAD Electrical
Autodesk 3ds Max
Autodesk Alias
Autodesk Inventor
Autodesk Maya
Autodesk Revit
Autodesk 123D
BricsCAD
Bentley MicroStation
BlenderCAD
BobCAD-CAM
CATIA
Delmia
DraftSight
FreeCAD
Femap
Fusion 360
Geomagic Design
IronCAD
JT
Kompas-3D
KeyCreator
KeyShot
Lagoa
Luxology
Mastercam
Moi3D
NX Unigraphics
OBJ
Onshape
OpenSCAD
Parasolid
Powermill
Powershape
Pro/Engineer Wildfire
PTC Creo Parametric
PTC Creo Elements
Rhino
SpaceClaim
SOLIDWORKS
solidThinking Evolve
Solid Edge
SolidFace
STEP / IGES
SketchUp
STL
TopSolid
TinkerCAD
T-Flex CAD
TurboCAD
VectorWorks
ViaCAD 3D
VRML / WRL
ZW3D
GrabCAD Print
Rendering
GrabCAD Community
GrabCAD Workbench
Text file
3D Manufacturing Format
Cinema 4D
Other
Skill level
All levels
Beginner
Intermediate
Expert
Autodesk Inventor
×
OpenSCAD
×
Solid Edge
×
How to create NPT (national pipe taper) threads using inventor
engineer
in
Modeling
13
3
Intermediate
I have had people ask me on here how I model npt threads for some of the parts I make, so I figured I would put it out there for others to see as well. Note: if you look at the threaded models I have on this website you will see that I have clearly taken more time on some of them than others, this tutorial will teach you how to do it the right and proper way.
Autodesk Inventor
threads
npt
how to make a render in autodesk inventor
dea
in
Modeling
12
0
Beginner
Create Rendered Images
Autodesk Inventor
render
How to create Rack & Pinion using Inventor 2016
Ebrahim Abu Has
in
Modeling
12
0
Intermediate
How to create Rack & Pinion with Inventor 2016 and show the motion??? Step by Step tutorial .... follow the link below https://www.youtube.com/playlist?list=PLCrNndUdp-R2RXvptMFVptVGuLDD0NV2f
Autodesk Inventor
constrains
drive
assembly
modelling
3d
2016
inventor
pinion
rack
IMPELLER IN AUTODESK INVETOR | AUTODESK INVENTOR TUTORIAL | 3D MODELING
ROHAN GUPTA
in
Modeling
12
1
Beginner
INVENTOR
Autodesk Inventor
Modelling of Piping Part
Mohit
in
Design & CAD
12
0
Beginner
Use for connecting two pipe at rectangle.
Autodesk Inventor
pipe
model
inventor
Design & Animation Flapping Wing Mechanism in Solid Edge
CAD CAM Learning
in
Modeling
11
1
Beginner
Video bellow show how to Design & Animation Flapping Wing Mechanism in Solid Edge Please SUBSCRIBE to my Youtube channel to update the latest videos. Wish you all the best. Thank you friends
Solid Edge
solidedgeanimation
solidedgedesign
flappingwingmechanism
Robot gripper of gear-rack drives mechanism Assembly & Animation in Solid Edge
CAD CAM Learning
in
Assemblies
11
1
Intermediate
Assembly & Animation Robot gripper of gear-rack drives mechanism in Solid Edge
Solid Edge
reobotgirppermechanism
solidedgeanimation
solidedgemotion
Inventor 2021 | Radial Engine | Assembly 9
CAD Pond
in
Assemblies
11
3
Beginner
In this video, I demonstrated the assembly of the cylinders and pistons with the crank case used in a typical radial engine. Video demonstrations to the parts used, can be found on my youtube channel linked in my profile. Happy Modeling!
Autodesk Inventor
airbus
inventor
engine
radial
aviation
boeing
airforce
aircraft
How to model a twisted connector with Autodesk Inventor
Jens Nielsen
in
Modeling
11
1
Beginner
Let's model this twisted connector and learn how to apply the loft tool. We will start with a simple sketch and extrusion, mirror this body, rotate it and then sketch 3d splines orient handles and dimension those. The loft will be defined by faces and rails.
Autodesk Inventor
Tutorial: Adding sub-assembly parts to an assembly parts list
Kevin Dobson
in
Design & CAD
11
3
Beginner
Special Thanks to William for letting me use one of his assemblies for this Tutorial.
Autodesk Inventor
parts
list
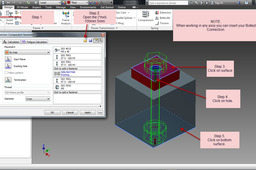
Tutorial: How to save time with Bolts, nuts, washers in Auto desk Inventor.
William
in
Design & CAD
11
2
Beginner
Answer
Autodesk Inventor
tipsntricks
Generative Design - Topology Optimization
John Devitry
in
Design & CAD
11
0
Beginner
Designer Based Structural Optimization Creating optimal next generation designs https://www.udemy.com/topologyoptimization/
Solid Edge
solidedge
optimization
topology
design
generative
SolidEdge Tutorial For Beginners | SolidEdge V20 | Practice Exercise 2 | CADable |
Ibrahim Omer
in
Design & CAD
10
3
Beginner
Hi welcome back to CADable. Here I am starting a new playlist related to basic tutorials of SOLIDEDGE. This is the 2ns tutorial of this playlist. It is a good exercise for beginners and it will be a good practice for beginners. In this tutorial, we will learn these commands: 1) 2D Commands & Relations 2) Protrusion 3) Cutout 4) Rib 5) Round 6) Chamfer 7) Thin Wall 8) Color Kindly use play pause technique for practice. I have attached files in the description for practice. Feel free to ask your queries in comment section. I will try to answer each and every question. Keep practicing as practice makes a man perfect. #solidedgepracticeexercise #solidedgebeginners #CADable https://grabcad.com/library/solidedge-practice-exercise-1 Kindly Subscribe our Channel for more Videos and Projects in SolidEdge, Solidworks, Blender & Keyshot. Please Like and Share Our Videos. Thanks for Watching. Follow our Channel: https://www.youtube.com/c/CADable
Solid Edge
solidedgev20
beginners
cadable
tutorials
solidedge
Car holder - Inventor
Mayara Gualberto
in
Assemblies
10
2
Beginner
Step-by-step tutorial for modeling and assembling the car holder in Autodesk Inventor software
Autodesk Inventor
easy
autodesk
inventor
car
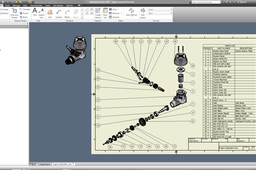
Inventor / Top-down design / Drive unit (Chapter 2)
Yoji Tanaka
in
Modeling
10
0
Intermediate
material. The design procedure from conception to detailed design is introduced using the drive unit as an example. Chapter 2 describes from the creation of the conceptual design model (LOD200) to the detail design (LOD300).
Autodesk Inventor
lod
top_down_design
inventor
1
2
3
4
…
100