Learn about the GrabCAD Platform
Get to know GrabCAD as an open software platform for Additive Manufacturing
Visit our new homepage
Home
Control
Shop
Streamline Pro
Partner Program
Print
Community
Log in
Library
Challenges
Groups
Questions
Tutorials
Engineers
Blog
Log in
Learn from thousands of free Tutorials.
New user?
Join the community
or
log in.
Tutorials
Most liked all time
Recent
Most liked
Most viewed
Most commented
This week
This month
All time
Category
Design & CAD
Modeling
Drafting
Assemblies
BOM
Dimensioning / Tolerancing
Translations
Manufacturing & CAM
3D Printing
Tooling
NC Machining
Composites
Measurement / Inspection
Simulation & CAE
FEM
CFD
Kinematics
Process Simulation
Engineering Fundamentals
Theory
Process
Standards
Other
Software
Snagit
Alibre Design
ArchiCAD
AutoCAD
AutoCAD Electrical
Autodesk 3ds Max
Autodesk Alias
Autodesk Inventor
Autodesk Maya
Autodesk Revit
Autodesk 123D
BricsCAD
Bentley MicroStation
BlenderCAD
BobCAD-CAM
CATIA
Delmia
DraftSight
FreeCAD
Femap
Fusion 360
Geomagic Design
IronCAD
JT
Kompas-3D
KeyCreator
KeyShot
Lagoa
Luxology
Mastercam
Moi3D
NX Unigraphics
OBJ
Onshape
OpenSCAD
Parasolid
Powermill
Powershape
Pro/Engineer Wildfire
PTC Creo Parametric
PTC Creo Elements
Rhino
SpaceClaim
SOLIDWORKS
solidThinking Evolve
Solid Edge
SolidFace
STEP / IGES
SketchUp
STL
TopSolid
TinkerCAD
T-Flex CAD
TurboCAD
VectorWorks
ViaCAD 3D
VRML / WRL
ZW3D
GrabCAD Print
Rendering
GrabCAD Community
GrabCAD Workbench
Text file
3D Manufacturing Format
Cinema 4D
Other
Skill level
All levels
Beginner
Intermediate
Expert
Autodesk 3ds Max
×
Rhino
×
GrabCAD Print
×
How to FDM Print for Part Sliding Clearance
GrabCAD Tutorials
in
Assemblies
13
4
Intermediate
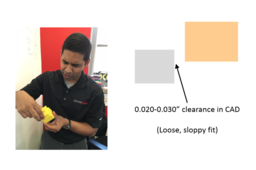
If you are 3D printing parts that have to fit/slide together after printing, you will need to put some sort of clearance between those parts in your CAD system. A good starting place is a clearance 2x the layer height you are going to print at, but you should make a few smaller test prints at different clearances to see if the 2x layer height rule holds for your particular situation and orientation. Have fun and happy printing!
GrabCAD Print
sliding
clearance
printing
3d
fdm
Tutorial: how to model revolving surfaces without degenerated point
Ferro
in
Modeling
12
2
Intermediate
This tutorial shows how to reconstruct a portion of a revolving surface, in order to remove the degenerated point
Rhino
patch
boundary
fair
degenerated
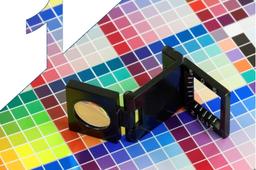
Part 1: A Look at Color Proofing
Naftali Eder
in
3D Printing
10
0
Beginner
This tutorial gives some background on color proofing and explains what to do when the color you print doesn't match the color you chose on screen. There will be future tutorials that expand on the topics mentioned here.
GrabCAD Print
polyjet
stratasys
matching
rgb
cmyk
proofing
color
Matte or Glossy? Which Finish to Use for Your 3D Prints and When.
Alexa Nahum
in
Modeling
9
0
Beginner
Matte or Glossy? That is the question. PolyJet users often ask themselves whether they should print a part with a matte finish or a glossy finish. And not without reason. The type of finish can totally alter the look, feel, color, and even strength and durability of two otherwise identical parts. Each option has its own benefits and implications that need to be considered. In this tutorial we will give an overview of matte and glossy, compare the pros and cons of each, and offer examples that clearly show what each finish type has to contribute. Finally, we will wrap up with a quick breakdown of when to use what.
GrabCAD Print
polyjet
disadvantages
advantages
cons
pros
support
glossy
matte
Video Tutorials from Rhino 3D Tutorials
Alexandre Galin
in
Modeling
8
0
Beginner
A series of little tutorials made available on my Youtube channel. For more detailed Rhino 3D tutorials here's the link https://rhino-3d-classes-from-beginner-to-advanced-lev.teachable.com/
Rhino
surfacing
3d
rhinoceros
taught
self
tutorials
prototyping
rhino3d
Filling basic 6-sided holes in Rhino
Bobi
in
Modeling
8
1
Beginner
This tutorial shows how to fill a 6-sided hole surrounded by simple planar surface transitions in Rhino.
Rhino
rhino
blend
hole
6-sided
surface
surfacing
nurbs
transition
Make a Ring With Text in Rhino
JOSE
in
Modeling
8
1
Expert
Make a ring with a text
Rhino
rhino
design
jewelry
GIF : Guide to How to make Simple Single Collet ( Emerald Ring )
Patel Deepak
in
Design & CAD
5
0
Intermediate
THE SERIES OF ANIMATED gif WILL GUIDE IN MAKING SIMPLET GRACEFUL RING.
Rhino
educatinal
solitaire
emerald
jewellery
rhino
ring
Make quickly a signet ring setting with a cabouchon
JOSE
in
Modeling
5
1
Expert
Make a signet ring setting with a cabouchon. Quickly
Rhino
jewelry
starlord Tutorial - image Pixel [ sampler ] with Rhino + Grasshopper
Matias Adrian Casciotta Gracia
in
Modeling
4
0
Intermediate
éste es un Tutorial para convertir una imagen en geometrías tipo Pixel this is a Tutorial to convert an image into Pixel geometries Regards! subscribe! MATGICAL@blogspot.com f DigitalMagical magicaldigital Ig
Rhino
programing
image
geometries
modeling
tutorial
grasshopper
rhinoceros
pixel
The Length And Width Of A Ring .
Beauty Roy Mondal
in
Design & CAD
4
0
Expert
How to measure the length and width of a ring . https://www.youtube.com/watch?v=0zKmm4ZYi10
Rhino
model
3d
animation
rhino
about
tutorial
jewelry
width
length
ring
Introduction to Pave setting, and its basic knowledge.
Beauty Roy Mondal
in
Modeling
4
0
Expert
What a Pave Setting Is The pavé setting, pronounced “pa-vay,” comes from the French word “to pave,” as in paved with diamonds. By closely setting small diamonds together with minimal visibility of the tiny metal beads or prongs holding the stones in place, the effect is one of continuous sparkle.
Rhino
cam
cad
modeling
fashion
jewelry
rhino
settings
diamond
setting
pave
How to model the StMary30st in Rhinoceros3D and show design intent.
Riccardo Gatti
in
Design & CAD
4
1
Beginner
Here my explanation on how to do
Rhino
building
rhino3d
skyscraper
london
designintent
gerkin
foster
3D Modeling and Animation of a Spherical Robot in 3DS Max - Part III
Yoana Ivanova
in
Modeling
3
1
Expert
The conceptual model creation is described in the following article: IVANOVA, Ioana and Stefka NENOVA, Computer Graphics as a Means of Increasing the Quality of Military Education, Report, Sofia: Yearbook of the Military Academy, 2013, pp. 141-155; http://rnda.armf.bg/wp/wp-content/uploads/2015/03/Binder-1-322.pdf; ИВАНОВА, Йоана и Стефка НЕНОВА, Компютърната графика като средство за повишаване качеството на военното образование, Доклад, София: Годишник на Военна академия, 2013, стр. 141- 155, http://rnda.armf.bg/wp/wp-content/uploads/2015/03/Binder-1-322.pdf ANIMATION PROCESSES: 1. Animating the model: it is performed by creating keyframes in the track under the working space that can be adjusted, changed and deleted. 2. Animating a camera: it is analogously to step 1. 3. Rendering process: it is required to be completed before saving the final image or animation in a desired format.
Autodesk 3ds Max
aerospace engineering
robot animation
space infrastructure
animation
Autodesk 3DS MAX Video Tutorial (1/14) for Beginner Level
TeachLAB27
in
Modeling
3
0
Beginner
Lesson 1 Content : - Viewports Concept and how to setting. - Unit Setting. - How to create and modify geometry objects. - How to use move, rotate and scale function.
Autodesk 3ds Max
free
level
basic
beginner
tutorial
max
3ds
1
2
3
…
8